Gerrit Guide
Gerrit is an opensource web-based collaborative code review tool that integrates with Git. Gerrit provides a framework for reviewing code commits before it merges into the code base. The changes are not made a part of the project until a code review completes. Gerrit is also a good collaboration tool for storing the conversations that occur around the code commits.
Note
Here is more information on Gerrit
Prerequisites
Before you get started, you should have:
an LFID account (sign up here)
git installed (see: http://www.git-scm.com/downloads)
git configured with your name, e-mail address and editor
git config --global user.name "Firstname Lastname"
git config --global user.email "email@address.com"
git config --global core.editor "text-editor-name"
Note
Your name and e-mail address (including capitalization) must match what you entered when creating your LFID account.
an ssh public/private key pair (see the good GitHub docs on generating ssh keys)
register in the Gerrit server. See below for detailed instructions. Register your SSH key with Gerrit
git-review installed (see: https://www.mediawiki.org/wiki/Gerrit/git-review#Installation)
Clone the code
Cloning the code into a local workspace can happen via HTTP or SSH.
Make sure your Gerrit settings are up to date with correct SSH and GPG keys.
In the project’s Gerrit instance, we can see the HTTP and SSH commands. From the left side menu, select Projects->List->Select any project->General.
Copy the desired clone command and paste it in your terminal.
SSH Clone
This option provides a more secure connection. We should always use SSH for pushing code unless the user is under a network that prevents SSH usage. In such case, use HTTPS.
Note
For more information on how to generate the public/private key pair see Generating SSH keys for your system and Register your SSH key with Gerrit
Note
The SSH clone option will not appear if the settings are not updated with the correct SSH keys.
Browse for the project’s General information.
Click on the ssh tab.
Clone desired repo. For example:
git clone ssh://USERNAME@gerrit.linuxfoundation.org:29418/releng/docs
Note
Since we are constantly working on uploading new code into the repositories, we recommend to use SSH clones since the remotes for pushing code get configured appropriately.
Anonymous HTTP Clone
Recommended if the intention is to view code and not make any contributions:
Browse the project and click
GeneralClick
anonymous httptab.Clone desired repo. For example:
git clone https://gerrit.linuxfoundation.org/releng/docs
Authenticated HTTP Clone
This works everywhere, even behind a proxy or a firewall.
Get the password by clicking on the username on the top right->Settings-> HTTP Password->Generate Password
Browse for the project and click
General.Click
httptab.Clone desired repo. For example:
git clone https://USERNAME@gerrit.linuxfoundation.org/infra/a/releng/docs
Follow the user/password prompts.
Note
For Gerrit < 2.14 the HTTP password is not the same as the Linux Foundation ID password.
Note
For Gerrit with HTTP configuration, the HTTP Password is in the User Name (Top right corner) -> Settings -> HTTP Password -> Generate Password.
Clone with commit-msg hook
Both SSH and HTTP clone options have a clone with commit-msg hook which adds a hook to handle the Change-Id field in the footer of the commit message.
Browse for the project and click
General.Click
Clone with commit-msg hook. For example:git clone ssh://USERNAME@gerrit.linuxfoundation.org:29418/releng/docs scp -p -P 29418 USERNAME@gerrit.linuxfoundation.org:hooks/commit-msg docs/.git/hooks/
OR
curl -Lo .git/hooks/commit-msg https://gerrit.linuxfoundation.org/infra/tools/hooks/commit-msg
Note
The hook implementation is intelligent at inserting the Change-Id line before any Signed-off-by or Acked-by lines placed at the end of the commit message by the author, but if no lines are present then it will insert a blank line, and add the Change-Id at the bottom of the message.
If a Change-Id line is already present in the message footer, the script will do nothing, leaving the existing Change-Id unmodified. This permits amending an existing commit, or allows the user to insert the Change-Id manually after copying it from an existing change viewed on the web.
(Optional). To prevent the Change-Id addition, set gerrit.createChangeId to false in the git config.
Push patches to Gerrit
Open a shell to the directory containing the project repo
Create a local working branch, based on the branch you would like to make changes to.
git fetch origin
git checkout -b new_feature_branch origin/master
Replace origin/master with whichever remote/branch you need to contribute to. Typically master is the latest development branch.
Make the modifications you would like to change in the project
Stage the modified files for commit. (Repeat for all files modified)
git add /path/to/file
Verify the staged files by running
git statusCommit the staged files by amending the patch
git commit -s
Note
The ‘-s’ argument signs the commit message with your name and email and is a statement that you agree to the Developer’s Certificate of Origin.
Push the patch to Gerrit using one of the 2 methods documented:
Push using git review
We recommend using git-review if possible as it makes working with Gerrit much easier.
Install
git-reviewvia your local package management systemIf your distro does not package git-review or you need a newer version.
Install it via PyPi in a virtualenv environment:
virtualenv ~/.virtualenvs/git-review
pip install git-review
Push the patch to Gerrit
git reviewWe can optionally pass the parameter
-t my_topicto set a topic in Gerrit. Useful when we have related patches to organize in one topic.
Once pushed we should see some output in the terminal as described in Gerrit Push Output.
Push using git push
This method is a useful fallback in situations where we cannot use git-review.
Use the following command:
git push <remote> HEAD:refs/for/master
Where <remote> is the Gerrit location to push the patch to. Typically ‘origin’ but can also be ‘gerrit’ depending on how we have our local repo setup.
Note
Notice the word “for” is explicitly intending to perform the push into Gerrit. Using “heads” instead, will attempt to make the a push into the repository bypassing Gerrit which can come in handy for some isolated cases (when having force push rights). Another variable commonly used is “refs/changes/<gerrit-number>” which is an explicit way of making an update to an existing gerrit. In such case, is best to let gerrit handle this via Change-Id in the commit text.
More options for this command: git-push.
Once pushed we should see some output in the terminal as described in Gerrit Push Output.
Push output
After pushing a commit to Gerrit we should see the following output:
   (releng) cjac@probook0:/usr/src/git/lf/gerrit.linuxfoundation.org/releng/docs$ git review
   remote: Processing changes: updated: 1, refs: 1, done
   remote:
   remote: Updated Changes:
   remote:   https://gerrit.linuxfoundation.org/infra/7404 documentation on the topic of git-review
   remote:
   To ssh://gerrit.linuxfoundation.org:29418/releng/docs.git
   * [new branch]      HEAD -> refs/publish/master/git-review-docs
This output includes a URL to the patch. The number at the end is the patch’s change number.
Update an existing patch
In a healthy Open Source project code reviews will happen and we will need to amend the patches until reviewers are happy with the change. This section will walk through the process of updating a patch that is already in Gerrit Code Review.
Open a shell to the directory containing the project repo
Pull the latest version of the patch from Gerrit
git review -d ${change_number}
The change number is in the URL of the Gerrit patch. For example if the URL is https://git.opendaylight.org/gerrit/75307 then run
git review -d 75307to pull the corresponding changes.(Optional) View information on the latest changes made to that patch.
To view the edited files, run
git show.To view a listing of the edited files and the number of lines in those files, run
git show --stat.
Rebase the patch before you start working on it
git pull --rebase
This is to ensure that the patch incorporates the latest version of the repo and is not out of date.
Make the necessary changes to the patch with your favorite editor
Check the state of the repo by running
git statusStage the modified files for commit. (Repeat for all files modified)
git add /path/to/file
Verify the staged files by running
git statusCommit the staged files by amending the patch
git commit --amend
Update the current patch description and then save the commit request.
If you feel as though you added enough work on the patch, add your name in the footer with a line
Co-Authored-By: Firstname Lastname <email>.Rebase the patch one last time
git pull --rebase
This is to ensure that the patch incorporates the latest version of the repo and is not out of date.
Submit your files for review:
git review
You will receive 2 emails from Gerrit Code Review: the first indicating that a build to incorporate your changes has started; and the second indicating the whether the build passed or failed. Refer to the console logs if the build has failed and amend the patch as necessary.
Update a patch with dependent changes
In the case where a patch depends on another in review Gerrit patch, we will need to rebase the commit against the latest patchset of the dependent change in Gerrit. The best way to do this is to retrieve the latest version of the dependent change and then cherry-pick our patch on top of the change.
Fetch latest parent patch set
git review -d <parent-gerrit-id>
Cherry-pick out patch on top
git review -x <patch-gerrit-id>
Push patch back up to Gerrit
git review -R
Rebasing a change against master
In the case that your patchset cannot be re-based via the U/I (merge conflict)
git pull origin master
git review -d 12345
git rebase master
"fix conflicts"
git add *
git rebase --continue
git review
Code Review
All contributions to Git repositories use Gerrit for code review.
The code review process provides constructive feedback about a proposed change. Committers and interested contributors will review the change, give their feedback, propose revisions and work with the change author through iterations of the patch until it’s ready for merging.
Managing and providing feedback for the change happens via Gerrit web UI.
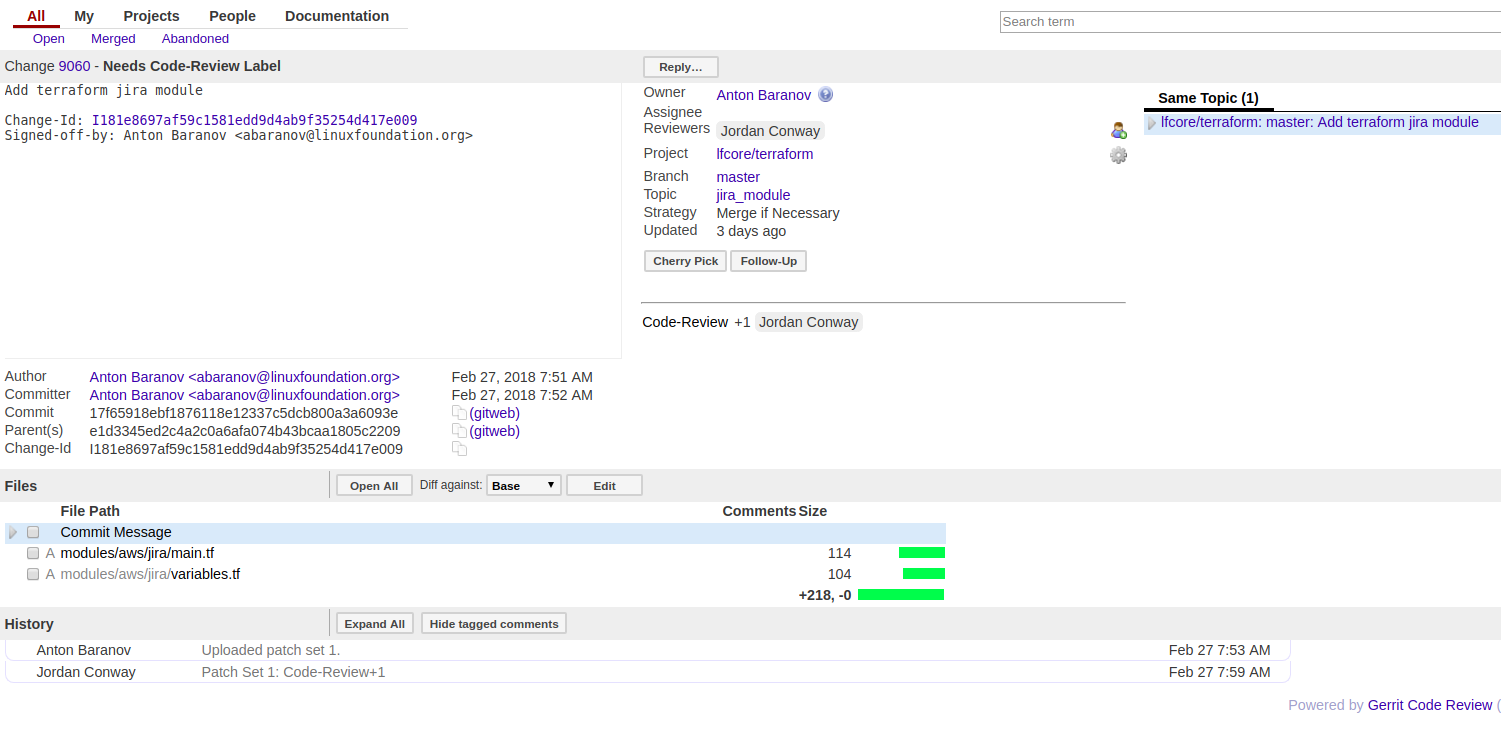
Gerrit wide view.
Pre-review
Change authors will want to push changes to Gerrit before they are actually ready for review. This is an encouraged good practice. It has been the experience of experienced community members that pushing often tends to reduce the amount of work and ensures speedy code reviews.
Note
This is not required and in some projects, not encouraged, but the general idea of making sure patches are ready for review when submitted is a good one.
Note
While in draft state, Gerrit triggers, e.g., verify Jenkins jobs, won’t run
by default. You can trigger them despite it being a draft by adding
“Jenkins CI” (or the corresponding Jenkins automation account) as a
reviewer. You may need to do a recheck by replying with a comment
containing recheck to trigger the jobs after adding the reviewer.
To mark an uploaded change as not ready for attention by committers and interested
contributors (in order of preference), either mark the Gerrit a draft (by adding
a -D to your git review command), vote -1 on it yourself or edit the commit
message with “WIP” (“Work in Progress”).
Do not add committers to the Reviewers list for a change while in the pre-review state, as it adds noise to their review queue.
Review
Once an author wants a change reviewed, they need to take some actions to put it on the radar of the committers.
If the change it’s a draft, you’ll need to publish it. Do this from the Gerrit web UI.
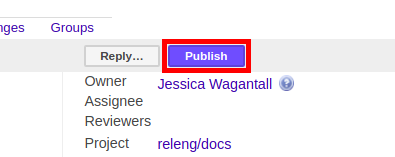
Gerrit Web UI button to publish a draft change.
Remove your -1 vote if you’ve marked it with one. If you think the patch is ready for merge, vote +1. If there is not an automated job to test your change and vote +1/-1 for Verified, you will need to do as much testing yourself as possible and then manually vote +1 to Verified. Reviewers can dditionally vote +1 for Verified along with automated jobs. Describing the testing you did or did not do is typically helpful.
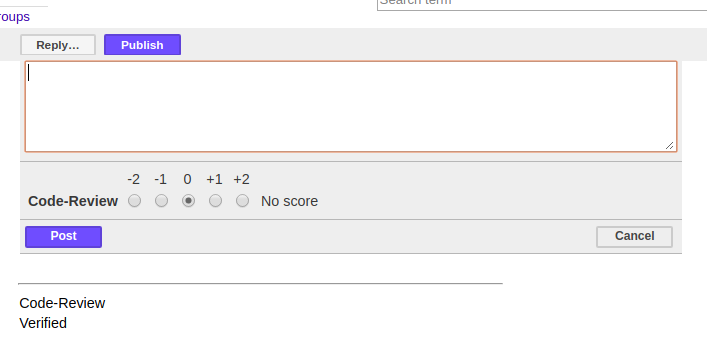
Gerrit voting interface, exposed by the Reply button.
Once the change gets published and you have voted for merging, add the people who need to review/merge the change to the Gerrit Reviewers list. The auto-complete for this Gerrit UI field is somewhat flaky, but typing the full name from the start typically works.

Gerrit Reviewers list with Int/Pack committers added
Reviewers will give feedback via Gerrit comments or inline against the diff.

Gerrit inline feedback about a typo
Updated versions of the proposed change get pushed as new patchsets to the same Gerrit, either by the original submitter or other contributors. Amending proposed changes owned by others while reviewing may be more efficient than documenting the problem, -1ing, waiting for the original submitter to make the changes, re-reviewing and merging.
Download changes for local manipulation and re-uploaded updates via git-review.
See Update an existing patch above. Once you have re-uploaded the patch the Gerrit web UI for the proposed change will reflect the new patchset.
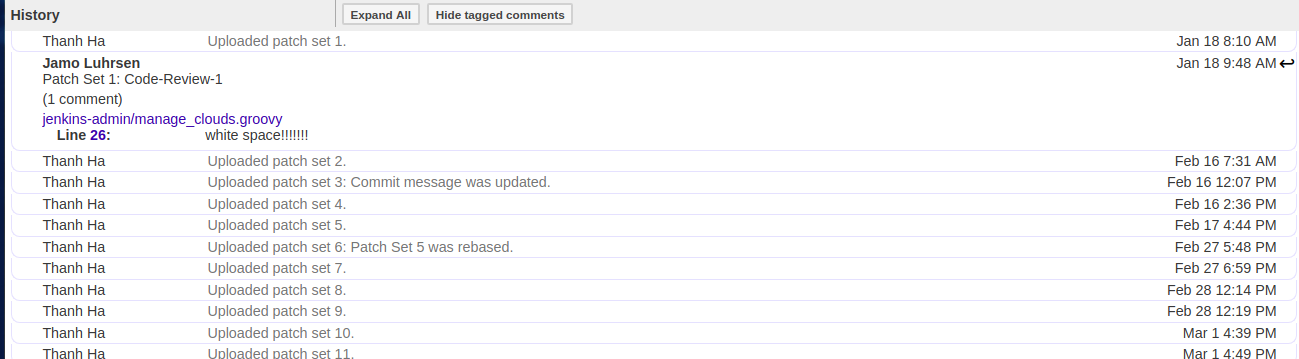
Gerrit history showing a patch update
Reviewers will use the diff between the last time they gave review and the current patchset to understand updates, speeding the code review process.
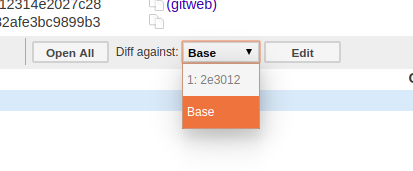
Gerrit diff menu
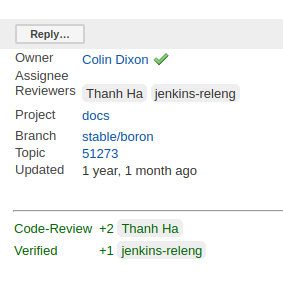
Iterative feedback continues until reaching consensus (typically: all active reviewers +1/+2 and no -1s nor -2s), at least one committer +2s and a committer merges the change.
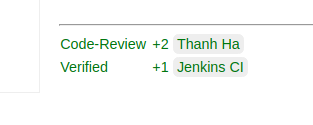
Gerrit code review votes
Merge
Once a patch has gotten a +2 from a committer and they have clicked the submit button the project’s merge job should run and publish the project’s artifacts to Nexus. Once completed, other projects will be able to see the results of that patch.
This is important when merging dependent patches across projects. You will need to wait for the merge job to run on one patch before any patches in other projects depending on it will successful verify.
Set up Gerrit
Generating SSH keys for your system
You must have SSH keys for your system to register with your Gerrit account. The method for generating SSH keys is different for different types of operating systems.
The key you register with Gerrit must be identical to the one you will use later to pull or edit the code. For example, if you have a development VM which has a different UID login and keygen than that of your laptop, the SSH key you generate for the VM is different from the laptop. If you register the SSH key generated on your VM with Gerrit and do not reuse it on your laptop when using Git on the laptop, the pull fails.
Note
Here is more information on SSH keys for Ubuntu and more on generating SSH keys
For a system running Ubuntu operating system, follow the steps below:
Run the following command:
mkdir ~/.ssh
chmod 700 ~/.ssh
ssh-keygen -t rsa
Save the keys, and add a passphrase for the keys.
This passphrase protects your private key stored in the hard drive. You must use the passphrase to use the keys every time you need to login to a key-based system:
Generating public/private rsa key pair.
Enter file in which to save the key (/home/b/.ssh/id_rsa):
Enter passphrase (empty for no passphrase):
Enter same passphrase again:
Your public key is now available as .ssh/id_rsa.pub in your home folder.
Register your SSH key with Gerrit
Using a Google Chrome or Mozilla Firefox browser, go to gerrit.<project>.org
Click Sign In to access the repositories.
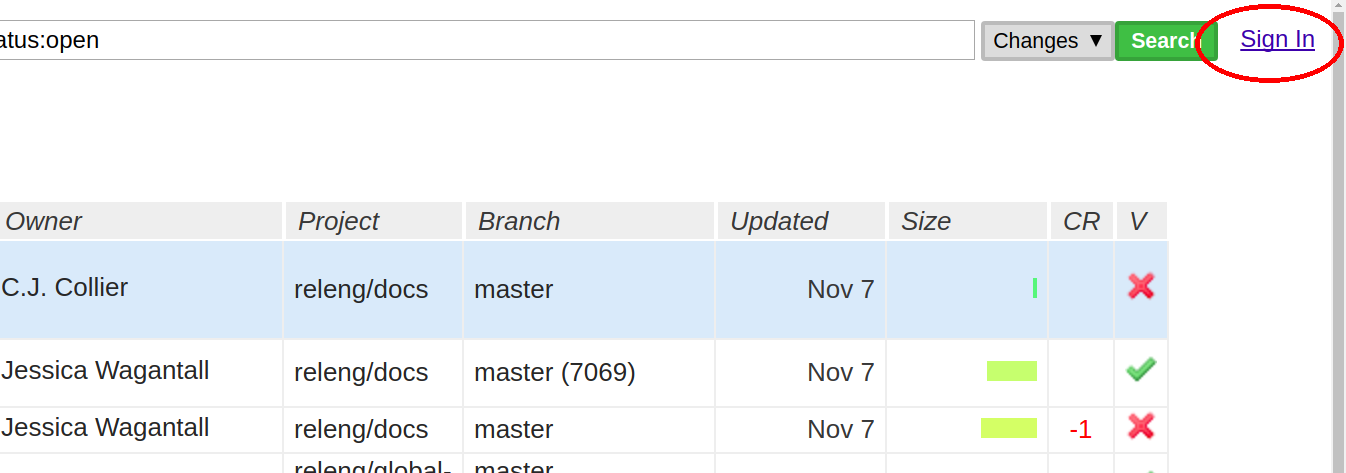
Sign into Gerrit
Click your name in the top right corner of the window and then click Settings.
The Settings page.
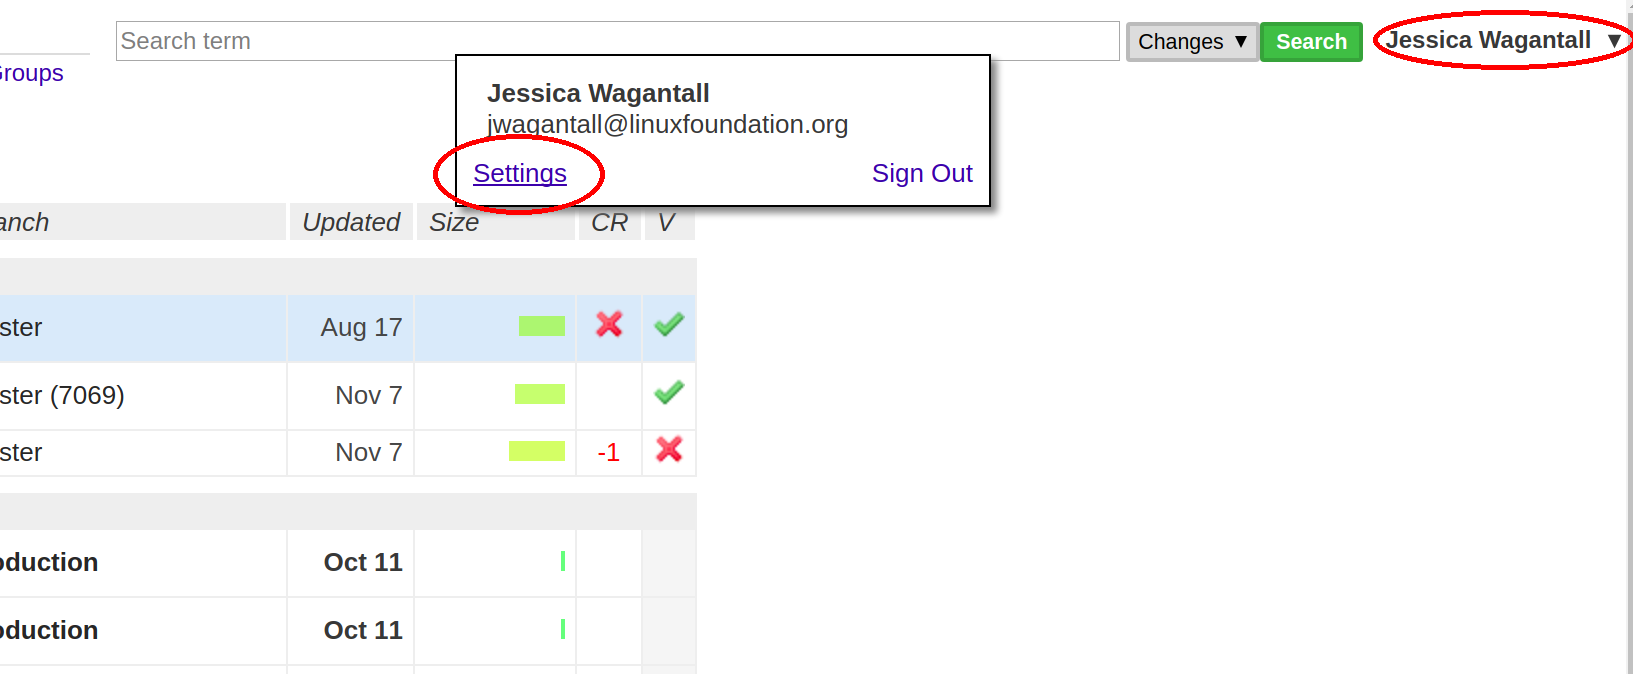
Settings page for your Gerrit account
Click SSH Public Keys under Settings.
Click Add Key.
In the Add SSH Public Key text box, paste the contents of your id_rsa.pub file and then click Add.
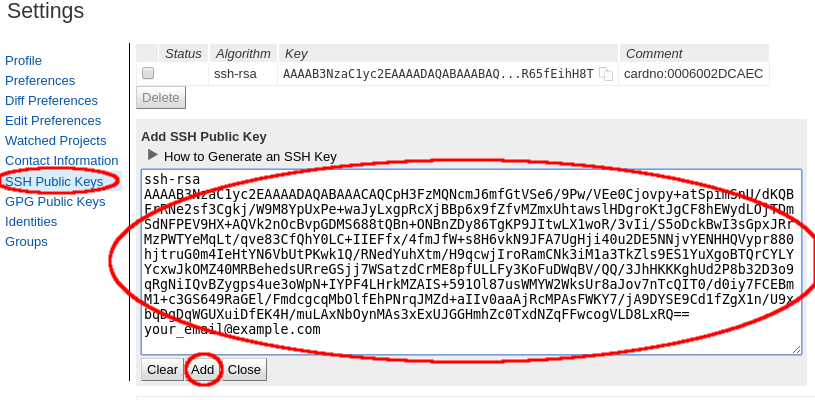
Adding your SSH key
To verify your SSH key, try using an SSH client to connect to Gerrit’s SSHD port:
$ ssh -p 29418 <sshusername>@gerrit.<project>.org
Enter passphrase for key '/home/cisco/.ssh/id_rsa':
****    Welcome to Gerrit Code Review    ****
Submit a patch over HTTPS
While we recommend you submit patchsets over SSH some users may need to submit patchsets over HTTPS due to corporate network policies such as the blocking of high range ports or outgoing SSH.
To submit code to Gerrit over HTTPS follow these steps.
Note
This guide uses the Linux Foundation Gerrit server and the releng/docs project as an example. Differences may vary with other Gerrit servers.
Configure your Machine
Generate a HTTPS password
Note
Required when uploading patches to Gerrit servers via HTTPS.
Navigate to https://gerrit.linuxfoundation.org/infra/#/settings/http-password and click Generate Password. Write this to the file .netrc in your home directory excluding the angle brackets:
machine gerrit.linuxfoundation.org user <username> password <http-password>
Clone the repository over HTTPS using your Linux Foundation ID
git clone https://bramwelt@gerrit.linuxfoundation.org/infra/releng/docs
Download the commit-msg git hook
curl -Lo .git/hooks/commit-msg \
  https://gerrit.linuxfoundation.org/infra/tools/hooks/commit-msg && \
  chmod +x .git/hooks/commit-msg
Due to a bug in git-review, you need to download the commit-msg hook manually to the .git/hooks/ directory or
git-review -swill fail.
Configure the Repository
Because git-review attempts to use SSH by default, you need
configure the git-review scheme and port through git-config in the
repository.
Note
The Gerrit context path on the Linux Foundation Gerrit server is
infra/. Others Gerrit servers may use gerrit/ or r/.
Perform the following commands
cd docs/
git config gitreview.scheme https
git config gitreview.port 443
git config gitreview.project infra/releng/docs
Verify the configuration by running the following command:
git review -s
If successful, the command will not print anything to the console, and you will be able to submit code with:
git review
Otherwise
git-reviewwill still request your Gerrit username, indicating a configuration issue.You can check the configuration using verbose output:
git review -v -s
Sign Gerrit Commits
Generate your GPG key.
The following instructions work on a Mac, but the general approach should be the same on other OSes.
brew install gpg2  # If you don't have homebrew, get that here: http://brew.sh/
gpg2 --gen-key
# pick 1 for "RSA and RSA"
# enter 4096 to creat a 4096-bit key
# enter an expiration time, I picked 2y for 2 years
# enter y to accept the expiration time
# pick O or Q to accept your name/email/comment
# enter a pass phrase twice. it seems like backspace doesn't work, so type carefully
gpg2 --fingerprint
# you'll get something like this:
# spectre:~ ckd$ gpg2 --fingerprint
# /Users/ckd/.gnupg/pubring.gpg
# -----------------------------
# pub   4096R/F566C9B1 2015-04-06 [expires: 2017-04-05]
#       Key fingerprint = 7C37 02AC D651 1FA7 9209  48D3 5DD5 0C4B F566 C9B1
# uid       [ultimate] Colin Dixon <colin at colindixon.com>
# sub   4096R/DC1497E1 2015-04-06 [expires: 2017-04-05]
# you're looking for the part after 4096R, which is your key ID
gpg2 --send-keys $KEY_ID
# in the above example, the $KEY_ID would be F566C9B1
# you should see output like this:
# gpg: sending key F566C9B1 to hkp server keys.gnupg.net
If you are collaborating in keysigning, then send the output of
gpg2 --fingerprint $KEY_IDto your coworkers.gpg2 --fingerprint $KEY_ID # in the above example, the $KEY_ID would be F566C9B1 # in my case, the output was: # pub 4096R/F566C9B1 2015-04-06 [expires: 2017-04-05] # Key fingerprint = 7C37 02AC D651 1FA7 9209 48D3 5DD5 0C4B F566 C9B1 # uid [ultimate] Colin Dixon <colin at colindixon.com> # sub 4096R/DC1497E1 2015-04-06 [expires: 2017-04-05]
Install gpg, instead of or addition to gpg2.
Note
you can tell Git to use gpg by doing:
git config --global gpg.program gpg2but that then will seem to struggle asking for your passphrase unless you have your gpg-agent set up right.Add your GPG to Gerrit
Run the following at the CLI:
gpg --export -a $FINGER_PRINT
# e.g., gpg --export -a F566C9B1
# in my case the output looked like:
# -----BEGIN PGP PUBLIC KEY BLOCK-----
# Version: GnuPG v2
#
# mQINBFUisGABEAC/DkcjNUhxQkRLdfbfdlq9NlfDusWri0cXLVz4YN1cTUTF5HiW
# ...
# gJT+FwDvCGgaE+JGlmXgjv0WSd4f9cNXkgYqfb6mpji0F3TF2HXXiVPqbwJ1V3I2
# NA+l+/koCW0aMReK
# =A/ql
# -----END PGP PUBLIC KEY BLOCK-----
Browse to https://git.opendaylight.org/gerrit/#/settings/gpg-keys
Click Add Key…
Copy the output from the above command, paste it into the box, and click Add
Set up your Git to sign commits and push signatures
git config commit.gpgsign true
git config push.gpgsign true
git config user.signingkey $FINGER_PRINT
# e.g., git config user.signingkey F566C9B1
Note
We can create a signed commit with
git commit -Sand a signed push withgit push --signedon the CLI instead of configuring it in config if we want to manually control which commits use the signature.Create a signed commit
Change a file
Create a signed commit with
git commit -asm "test commit"This will result in Git asking you for your passphrase. Enter it to proceed.
Push to Gerrit with a signed-push with
git reviewThis will result in Git asking you for your passphrase. Enter it to proceed.
Note
The signing a commit or pushing again with a signed push is not recognized as a “change” by Gerrit, so if you forget to do either, you need to change something about the commit to get Gerrit to accept the patch again. Slightly tweaking the commit message is a good way.
Note
This assumes you have git review set up and push.gpgsign set to true. Otherwise:
git push --signed gerrit HEAD:refs/for/masterThis assumes the gerrit remote is available, if not, configure something like:
ssh://ckd@git.opendaylight.org:29418/<repo>.gitwhere repo is something like docs or controller
Verify the signature
To do this, navigate to Gerrit and check for a green check next to your name in the patch.
Example signed push to Gerrit.
Appendix
Developer’s Certificate of Origin (DCO)
Code contributions to Linux Foundation projects must have a sign-off by the author of the code which indicates that they have read and agree to the DCO.
Developer Certificate of Origin
Version 1.1

Copyright (C) 2004, 2006 The Linux Foundation and its contributors.
1 Letterman Drive
Suite D4700
San Francisco, CA, 94129

Everyone is permitted to copy and distribute verbatim copies of this
license document, but changing it is not allowed.


Developer's Certificate of Origin 1.1

By making a contribution to this project, I certify that:

(a) The contribution was created in whole or in part by me and I
    have the right to submit it under the open source license
    indicated in the file; or

(b) The contribution is based upon previous work that, to the best
    of my knowledge, is covered under an appropriate open source
    license and I have the right under that license to submit that
    work with modifications, whether created in whole or in part
    by me, under the same open source license (unless I am
    permitted to submit under a different license), as indicated
    in the file; or

(c) The contribution was provided directly to me by some other
    person who certified (a), (b) or (c) and I have not modified
    it.

(d) I understand and agree that this project and the contribution
    are public and that a record of the contribution (including all
    personal information I submit with it, including my sign-off) is
    maintained indefinitely and may be redistributed consistent with
    this project or the open source license(s) involved.
Refer to https://developercertificate.org/ for original text.
Gerrit Topics
Topics are useful as a search criteria in Gerrit. By entering topic:foo
as a search criteria we can track related commits. Use one of the following
methods to configure topics:
Directly in the Gerrit UI via the Edit Topic button
Via
git reviewusing the-t topicparameterNote
git-review defaults to the local branch name as the topic if it does not match the upstream branch.
Via
git pushusing one of the following methods:git push origin HEAD:refs/for/master%topic=some-topic git push origin HEAD:refs/for/master -o topic=some-topic
Both methods achieve the same result so is up to preference. Further documentation available at Gerrit Topics.